To get started, just click on any of the topics via the table of contents. Good luck!
Table of Contents:
For Beginners:
1. What are the basic HTML codes I can use for my Multiply page?
2. How do I put pictures in my journal entries?
3. How do I put put scrolling/moving text (Otherwise known as the marquee)?
For beginners:
This is for everyone without HTML background or formal training in using HTML editing programs like Dreamweaver. The codes and tutorials I will be posting here will hopefully be easy to copy and then transferred to the appropriate areas in your Multiply page!
Remember all HTML must be enclosed in opening and closing quotes ( < > </ > )
1. What are the basic HTML codes I can use for my Multiply page?
Here's a rundown of all the basic HTML Codes you can use for regular posting in Multiply:
If you want a link like this you must enclose the text that you want to turn into a link with the following HTML code or Tags:
<a href="http://tarugoman.deviantart.com" target="_blank">link like this</a>(NOTE: the code target="_blank" allows for the link to be opened in another browser window)
If you want Bold-faced text, enclose the text you want to be bold-faced in the following HTML Tags or Code just like this (either code will work fine):
<b>Bold-faced</b> or <strong>Bold-faced</strong>(NOTE: Making small text bold-faced will usually not show, so most of the time, no need to bold-face small text)
If you want Italicized text, enclose the text you want to become Italicized in the following HTML Tags or Code just like this (either code will work fine):
<i>Italicized</i> or <em>Italicized</em>(NOTE: Italics is leaning text, in case you didn't notice.... duh!)
If you want to change the size of your text, enclose the text you want to enlarge or reduce in the following HTML Tags or Code just like this:
<font size="1">to change the size of your text</font>The smaller the number, the smaller the font, "1" being the smallest font and "7" being the biggest. Try it out so you can see the differences!
If you want to change the color of your text, enclose the text you want to color in the following HTML Tags or Code just like this:
<font color="red">Change Color</font>You can specify the color you want by typing in the actual name of the color. Acceptable variables are "Red" "blue" "yellow" "green" "white" "black" among others. You can also use the Hex Value of the color itself if you want something more specific. The code will look something like this:
<font color="#FF0000">Change Color</font>Check out Cheryl's html color guide for more info on what suitable colors to use! Try it out so you can see the differences!
*(If you cannot view Cheryl's Album because you are not connected to her network, click here instead)
If you want a whole paragraph that is indented, or at least you want to highlight a paragraph outside of the normal layout like this:
TEXT TEXT TEXT TEXT TEXT TEXT TEXT TEXT TEXT TEXT TEXT TEXT TEXT TEXT TEXT TEXT TEXT TEXT TEXT TEXT TEXT TEXT TEXT TEXT TEXT TEXT TEXT TEXT TEXT TEXT TEXT TEXT TEXT TEXT TEXT TEXT TEXT TEXT TEXT TEXT TEXT TEXT
TEXT TEXT TEXT TEXT TEXT TEXT TEXT TEXT TEXT TEXT TEXT TEXT TEXT TEXT TEXT TEXT TEXT TEXT TEXT TEXT TEXT TEXT TEXT TEXT TEXT TEXT TEXT TEXT TEXT TEXT TEXT TEXT TEXT TEXT TEXT TEXT TEXT TEXT TEXT TEXT TEXT TEXTTEXT TEXT TEXT TEXT TEXT TEXT TEXT TEXT TEXT TEXT TEXT TEXT TEXT TEXT TEXT TEXT TEXT TEXT TEXT TEXT TEXT TEXT TEXT TEXT TEXT TEXT TEXT TEXT TEXT TEXT TEXT TEXT TEXT TEXT TEXT TEXT TEXT TEXT TEXT TEXT TEXT TEXT
...enclose the text you want to blockquote in the following HTML Tags or Code just like this:
TEXT TEXT TEXT TEXTBased on the above code, when you put blockquotes on, the next paragraph should be right after the blockquote closing code, and not on the next line, or else it will create 2 spaces instead of one.
<blockquote>TEXT TEXT TEXT TEXT</blockquote>TEXT TEXT TEXT TEXT
If you want to put bullet points in front of lines of text, as in with a list like this:
Then all you have to do is enclose the paragraph or the line of text in the following HTML code or tags:
<li>Bullet Point</li>(NOTE: Like the <blockquote> code, it creates an extra break space inbetween lines, so it appears as if you pressed enter twice to create a bigger space between paragraphs.)
If you want to separate paragraphs or parts of your entries with a Horizontal Line (much like what I've done with these sections) all you have to do is input the following code:
<hr>
If you want to underline text enclose the text you want to underline in the following HTML Tags or Code just like this:
<u>to underline text</u>Don't forget though, that most text links are underlined by default, so putting too many underlines in a page can cause confusion for your users.
If you want text that looks like it's been
<s>crossed out</s>
2. How do I put pictures in my journal entries?
If you want to post images in the body of your journal entries, or in your headers, etc. like this:
Use this HTML code:
<img src="IMAGE URL" border="0" alt="It's ME!">URL is short for Uniform Resource Locator. It is the web address of a specific file or web page. My personal URL is http://tarugoman.multiply.com
NOTE 1: The code <alt="It's Me!"> allows the text "It's Me!" to pop-up when you mouse over the image. You can customize it with whatever text you wish.
NOTE 2: The code <border="0"> puts a border around your image. The bigger the number, the thicker the border. And unless you specify it in your code, the if your picture is clicable, the border color will automatically turn blue
If you don't know the URL of your image, you'll have to do these three (3) things.
1) First, you'll have to identify the File Name of the image you want to post! The File Name is the name of the image file that you would like to upload! For example, the image I posted above is entitled AVATAR_IGGY2.jpg
Image files usually have the following extensions: ~.jpg ~.gif ~.bmp
While there are others that have the following extensions: ~.tga ~.tif ~.png
And many others... but the ones listed above are the most common used for the web.
2) Now that you have identified the File Name of the image, you will have to upload the image to the internet. You can do this using two methods: you can create an album in your Multiply page and save your image there, or you can create a Photobucket account and upload your image there.
Photobucket is also free, so you won't have to worry about paying... and they have a huge bandwidth allocation for their users... what this means is, you can post images and directly link to them without having to worry about your image disappearing on you!
You can also use your Multiply photo album as an alternative for hosting an image on the web. If using Multiply for your image storage, create a new album (if you wish), and just upload images like normal.
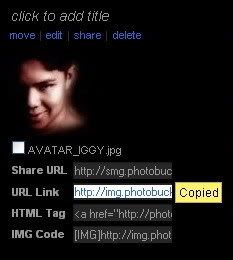
3) Now that your image is hosted on the internet, you now have to determine the URL of the image itself!
Using Photobucket is easy since the image URL (including the necessary HTML code) is already available.
To finally post the image in your Multiply entry use the following HTML code, with the URL that you got from Step 3 above:
<img src="http://images.tarugoman.multiply.com/image/1/photos/1/600x600/47.jpg">The image that you uploaded into your Multiply photo album can now be posted on your other Multiply entries!
To make an image clickable like this:
All you have to do is enclose the image code in the same link code pasted in Question 1, Topic 1 earlier, like so:
<a href="URL to go to"><img src="IMAGE URL" alt="It's Me" border="2"></a>Notice that I placed border="2" with the code... you'll notice that there is a blue/purple border around the image. If you don't want the border to come out, just place zero (0) as the border value.
3. How do I put put scrolling/moving text (Otherwise known as the marquee)?
<marquee direction="left" scrollamount="3">MARQUEE TEXT</marquee>NOTE 1: Direction obviously dictates which direction your marquee will go. You can use up, down, left or right.
NOTE 2: Scrollamount will dictate how fast your marquee will move. The higher the number, the faster the scroll.
<marquee behavior="alternate">MARQUEE TEXT</marquee>NOTE 3: If you want to enclose big text or different-colored fonts within a Marquee, the Marquee code has to be outside the font and color and bold-faced HTML code, like so:
<marquee behavior="alternate"><strong>MARQUEE TEXT</strong></marquee>
That's it for now... I hope to finish the rest of the tutorial very soon... with more interesting things to put into your page as well! But for now, good luck and enjoy!
No comments:
Post a Comment